

News

How to Choose the Best Bedwetting Alarm for Your Child
What's the best bedwetting alarm for my child? At first, nocturnal enuresis (best known as bedwetting) sounds like a disease, but it’s not. Even so, in some children, it can cause serious embarrassment and poor self-esteem. What is Nocturnal Enuresis? Nocturnal enuresis, in layman’s terms, is bedwetting. If you have a child over the age of six who is wetting the bed, you may have tried everything and now you are wondering if there is any help. There is, and it’s called a bedwetting alarm. How does a bedwetting alarm work? One of the main causes of bed wetting in children is a combination of deep sleeping patterns and over production of urine. Making use of a bed alarm for bedwetting can help teach a child’s body to better respond to a full bladder, as well as help break the deep sleep cycles that often go along with it. An electronic bedwetting alarm sounds an alert as soon as a child begins to urinate. Bedwetting alarms are designed to help train the brain to recognise when the bladder is full, so your child can wake and use the toilet. A bedwetting alarm “senses” moisture as the first drops of urine are released, and sounds an alarm to wake the child. Over time, the goal is for the feeling of a full bladder to replace the alarm as the trigger to wake up and go to the toilet. Bedwetting alarm therapy is a type of behavioural conditioning, but in practice, it’s simply helping your child build that connection. Modern options have come a long way too. Some bedwetting alarm underwear now have sensors built directly into the fabric, so there’s no need for clips or separate sensor pads, which can make things a bit easier, especially for younger kids. Bedwetting alarms are safe and commonly recommended by continence nurses as a way to help stop bedwetting. There are different types of alarms, each working slightly differently to suit your child’s needs. We've found the best bedwetting alarms: Different Types of Bedwetting Alarm, Which Is Right for Your Child? #1 Wearable Bedwetting Alarms (with cord) The Rodger Wireless Bedwetting Alarm is Moose Baby’s best-selling bedwetting alarm. Instead of clips and cords, it uses bedwetting alarm underwear with sensors sewn directly into the fabric. There’s nothing to attach before bed, and nothing sitting against the skin that can move around or fall off overnight. When moisture is detected, it’s picked up straight away, and a small transmitter in the underwear sends a wireless signal to the base unit. The alarm sounds immediately, helping your child start to link the feeling of a full bladder with waking up. It can also be used during the day if needed, and suits both children and older users. For deeper sleepers, you can add a vibration unit like the Rodger Bed-Shaker Vibrating Unit, which sits under the mattress and adds a physical vibration along with the sound. You can also purchase extra sensor briefs, so you can rotate pairs without needing to wash and dry them the same day. And if anything gets lost or damaged, replacement transmitters can be picked up separately too. #2 Portable Daytime Wetting Alarm — For On-the-Go & Potty Training The Rodger Wireless Amigo Day Alarm is a small, lightweight, portable wetting alarm designed for daytime use — making it ideal for parents looking for support beyond the bedroom. It clips discreetly to clothing with a magnetic clip and works with Rodger sensor briefs, detecting the first drops of moisture and alerting your child with a sound or vibration signal. Parents searching for a "daytime wetting alarm", "potty training alarm", or "portable wetting alarm for car trips" will find the Amigo fills a gap that most bedwetting alarms simply can't — it goes wherever your child goes. Whether you're on a day trip, in the car, at preschool, or out shopping, the Amigo can quietly support your child's bladder awareness without drawing attention. Many parents also use it as a potty training tool for toddlers who are already showing readiness signs — the gentle alert helps young children connect the sensation of a full bladder to the need to go, in real time. Moose Baby is one of the only retailers in New Zealand and Australia offering the Rodger Amigo Day Alarm, making it a genuinely unique option for local families seeking daytime or portable wetting support. The vibration-only mode means it can be used discreetly in public settings, giving older children the privacy to manage accidents without embarrassment. #3 Wearable Bedwetting Alarms (with Sensor Clip) With this type of wearable bedwetting alarm, the sleeper places a small moisture sensor in their pyjama bottoms or underwear (in the line of fire). When moisture is detected, the alarm sounds immediately to wake the child. Because the sensor reacts to the first drops, your child has a chance to wake and get to the toilet before the bed is fully wet. Over time, this helps their brain start to recognise the feeling of a full bladder and respond to it. The WetStop3 Bedwetting Alarm is one of the most widely used options in this category, and a good place to start if you’re trying a bedwetting alarm for the first time. It’s easy to set up and one of the more affordable products available. The sensor clips into underwear and connects to the alarm unit via a cord, which attaches to the collar. When triggered, it uses both sound and vibration to wake your child. #4 App-Connected Bedwetting Alarms — Oopsie Heroes Plus The Oopsie Heroes Plus Bedwetting Alarm takes a different approach by connecting to a smartphone app rather than a traditional alarm unit. A small, comfortable sensor attaches to your child's underwear or pyjama bottoms with adhesive stickers — no special clothing required. When moisture is detected, the sensor sends a safe audio signal to the app on your phone or tablet, which then wakes your child using the alarm sound of your choice — including a recording of your own voice. Research suggests that a familiar voice is more effective at waking deep sleepers than a standard alarm tone, making this a particularly compelling option for children who sleep heavily. The app also automatically logs bedwetting events over time, helping parents spot patterns and track progress toward dry nights. A built-in reward system and hero characters (choose a boy or girl) keep younger children motivated and engaged with the process. Key features include: App-based — no separate alarm unit needed; your phone does the work Parent Voice Alarm — record your own voice as the wake-up sound, proven more effective for deep sleepers Automatic event logging — track progress and identify patterns No Bluetooth — uses safe audio signals Fun and motivating — hero characters and a built-in reward system Works with any underwear — no special sensor briefs required The Oopsie Heroes Plus is particularly well-suited to younger children and families who want an engaging, tech-enabled approach to bedwetting training. How long does it take to stop bedwetting? Bed wetting therapy experts have estimated that, with consistent and proper use, the best bedwetting alarms will train children to wake before wetting in around 4 to 10 weeks. Some train much quicker, within days, others take longer. Bedwetting alarms are successful in around eighty percent of young bedwetters. Ready to find the right alarm for your child? Browse MooseBaby's full range of bedwetting alarms and training products. Alarm Type Alarm Type Useful for Advantages Price Wet Stop 3 Wearable alarm with clipped on sensor and cord Sound and vibration Children Cost effective. Simple to use. Proven success (sold since 1979). $109.99 Rodger Amigo Day Alarm Wireless portable daytime alarm with sensor underwear Sound and/or vibration Children with daytime wetting/incontinence, school-aged kids, potty training Portable, discreet, instant urine detection, no wires, app progress tracking from $149 Rodger Wireless Alarm Wireless — sensor underwear Sound (+ optional bed shaker) Children Adults Special Needs Latest technology. Comfortable – sewn-in sensor underpants. No cords. Moisture detected immediately. Vibration device can be attached to wake very deep sleepers or those sharing a room. Can we worn during the day or night. from $239.99 Oopsie Heroes Wearable sensor 'talks' to a device/app Sound Voice (parent) Younger children Special Needs Latest technology. Comfortable - no cords. Moisture detected immediately. Can activate alarm using a recording of parent's voice. $205.00
Learn more
Must-Have Baby Items NZ: The 2026 Essential Checklist for New Parents
What if your nursery didn't need to look like a perfectly curated social media feed to be exactly what your pēpi needs? It's completely natural to feel a sense of budget anxiety when you see the price tags on designer pr…
Learn more
What Is the Bumbo Elipad and Why It’s Worth Buying
If you’re searching for the Bumbo Elipad and wondering whether it’s actually useful, you’re not alone. Parents across New Zealand are looking for practical products that make daily routines easier. The Bumbo Elipad is one of those simple, multipurpose items that quietly becomes part of everyday life. It works as a kneeling pad for bath time and a portable floor cushion toddlers can sit on, all in one lightweight design. Let’s break it down. What Is the Bumbo Elipad? The Bumbo Elipad is a durable foam comfort pad designed for both parents and toddlers. It can be used as: A kneeling pad for bath time A knee cushion for hard floors A soft floor cushion for toddlers A portable comfort pad for indoor and outdoor use You can view it here: https://www.moosebaby.co.nz/products/bumbo-elipad It’s lightweight, includes a built-in carry handle, and wipes clean easily. The foam is firm enough to stay supportive without flattening over time. It’s suitable for toddlers aged around 2 years and older who can sit independently. Why Parents Use the Bumbo Elipad 1. A Practical Kneeling Pad for Bath Time Many homes have tiled bathrooms or hardwood flooring. Kneeling on these surfaces daily adds up. The Elipad provides cushioning that protects your knees during: Bath time Floor Play Cleaning Gardening It’s a simple solution that makes everyday routines noticeably more comfortable. 2. A Soft Floor Cushion for Toddlers Toddlers naturally sit on the floor during play. Hard surfaces aren’t always comfortable. The Elipad provides a portable cushion toddlers can use during: Reading time Puzzle play Watching a show Picnics Outdoor sports Family gatherings It doesn’t elevate or restrain. It simply adds comfort. 3. Designed for Indoor and Outdoor Use This is where its versatility stands out. One product moves easily from: Bathroom Living room Backyard Park Beach Car For families who spend time both indoors and outdoors, having one lightweight pad that works everywhere makes sense. If you’re exploring other practical options, you can browse the full Bumbo range here: https://www.moosebaby.co.nz/collections/bumbo 4. Easy to Clean and Low Maintenance Toddler products need to be practical. The Elipad wipes clean with a damp cloth and mild detergent. No removable covers. No complex washing instructions. That makes it ideal for regular use around water, grass, sand, and everyday spills. Is the Bumbo Elipad Worth Buying? Yes. It’s versatile. It supports both parent and child. It works indoors and outdoors. It replaces the need for separate kneeling pads and floor cushions. Instead of buying multiple single-purpose products, you get one durable, multipurpose comfort solution. That consistent everyday use is what makes it worth it. Frequently Asked Questions 1. Where can I buy the Bumbo Elipad? You can purchase it directly from Moosebaby here: https://www.moosebaby.co.nz/products/bumbo-elipad 2. What age is the Bumbo Elipad suitable for? It’s best suited for toddlers aged around 2 years and older who can sit independently. 3. Can the Bumbo Elipad be used outdoors? Yes. It’s lightweight and portable, making it suitable for parks, beaches, sports events, and travel. 4. Is the Bumbo Elipad easy to clean? Yes. It wipes clean with a damp cloth and mild detergent. 5. Is the Bumbo Elipad only for toddlers? No. It’s designed for both parents and toddlers. Parents commonly use it as a bath time kneeling pad.
Learn more
The Real Reason Some Bedwetting Alarms Don’t Work – And What Actually Helps
Bedwetting can be frustrating for both kids and parents. If you’ve tried a bedwetting alarm before—or you’re thinking about getting one—you may have noticed that some alarms just don’t seem to help. The good news? Understanding why some alarms fail can make a huge difference in helping your child stay dry at night. The Problem with Traditional Alarms Many traditional bedwetting alarms only go off after urine has already soaked through. By the time the alert sounds, it’s too late for your child to learn the connection between a full bladder and waking up. This can slow down the learning process and make bedwetting harder to manage. What Makes a Bedwetting Alarm Effective? For an alarm to actually help, it needs to link the feeling of a full bladder with waking up. The learning process is faster and more consistent when the alarm triggers immediately at the first sign of moisture. Why Rodger is Different Rodger bedwetting alarms are designed to make nighttime training easier and more effective. Here’s why it’s our #1 bestseller: ✅ Instant moisture detectionSensors are built right into the training underwear, so it triggers the moment wetness is detected. ✅ Completely wirelessNo cords to tangle, no clips pulling off—making it easier for kids to sleep comfortably. ✅ Comfortable, child-friendly setupA system kids can actually stick with night after night. Worried About Heavy Sleepers? Many parents worry their child might be too deep a sleeper. Rodger has you covered: 🔔 Optional bed shaker – adds an extra wake-up cue, helping even the heaviest sleepers wake up in time. Tips for Getting the Best Results Introduce the alarm positively – explain how it works and include it in your bedtime routine. Celebrate dry nights – small rewards can help motivate your child. Be consistent – use the alarm every night for the best results. Support daytime toilet habits – regular toilet trips during the day improve night-time success. Shop Bedwetting Solutions Make bedwetting easier for your child and family. Check out our range of bedwetting alarms and toilet training products:
Learn more
Should You Pause the Bedwetting Alarm While on Holiday?
Wondering if you should pause your child’s bedwetting alarm during the holidays? In this blog, we explore when to keep going, when to take a break, and how to support your child with travel-friendly tools like the Rodger Amigo Daytime Alarm and Rodger Buddy Vibration Watch. Plus, we answer the common question: how can I stop my child from bedwetting? Whether you're staying on track or hitting pause, we’ve got practical tips to help you feel confident on the go.
Learn more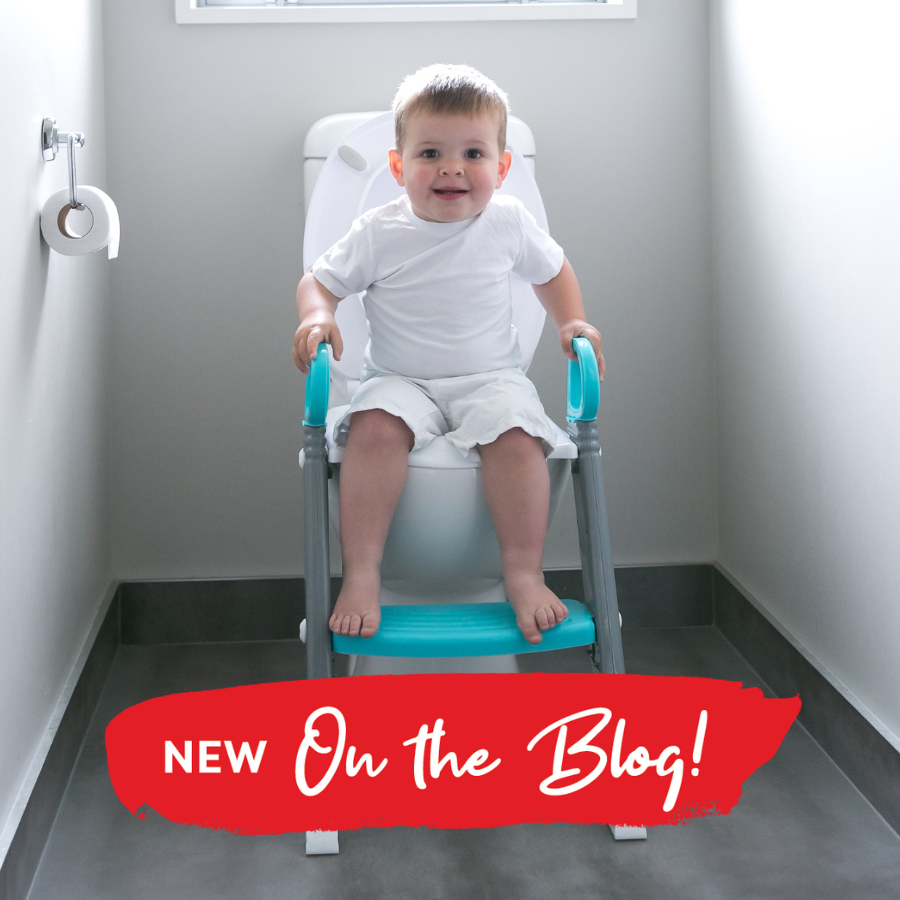
Is my toddler ready for toilet training?
Timing is everything when it comes to toilet training success. As any parent who's been through it can tell you, trying to force the toilet on a ‘not-quite-ready’ toddler only prolongs the process (and the agony!). So how can you tell if your little one is ready to make the leap from nappies to the toilet? Check out these 10 signs that they're ready: Shows an interest in the toilet, potty or underpants. Stays dry for two or more hours. Wants to watch you ‘go’. ‘Number two’s’ happening on a predictable schedule. Complains about wet or dirty nappies, and wants to be changed. Can follow basic instructions. Understands basic vocab like "wee" and "poo." Can tell you when he needs to go—or uses body language, like going into a corner or grunting. Can pull her pants up and down with little assistance. Can learn to use a step-on-up toilet trainer seat. Shop our toilet training must-haves.
Learn more
12 Genius Play Pen Uses for endless fun (& safety)
A playpen can transform any inside or outside space into a safe, fun-filled adventure zone for your little one! Whether you’re taking your baby on holiday, to the beach or grandma’s antique-filled house, here’s our 12 genius uses for your play pen. 1. New baby AND a feisty toddler? With a brand-new baby at home, it can take some adjusting for your toddler. He may think your newborn is ready for some rough & tumble or a tight squeeze, but it’ll take time for your toddler to learn to be gentle. A play pen is a safe-haven for baby until your toddler masters the art of gentle hands. 2. There’s a pooch in the house You may not know how your over-affectionate dog is going to react to the new little human in the house. He used to be the centre of attention and now he’s not. It often takes time to safely train and introduce your baby to your doggo, so until you can build trust, a safe and comfortable barrier like a playpen is a good option. 3. It’s Tummy Time! We all know how important tummy time is for babies, so make tummy time in your playpen as visually stimulating and fun as possible by creating a comfortable and fun space. Add an activity gym, a mirror, crinkly toys, textured toys, black-and-white books, and mix up the selection each time. 4. Family Camping Essential Make camping with little ones easier by providing a safe place for them to play and rest while still being part of the action. Camping is full of hazards for crawling babies and toddlers, including the BBQ, brazier, cords, countless small objects they can put in their mouths, and the water's edge. A playpen can help keep them safe and secure amidst the adventure. 5. Holiday Homes Your own home may be baby-proofed with safety gates, door latches and fire guards but if you take bubs to a holiday home, chances are it’s not 100% safe for bubs to crawl around without being constantly followed. For peace of mind use your play pen to keep bubs safe, while you help with dinner, nip to the loo or bring in the groceries. 6. Curse of the Lego! Need I say more? If you have a baby, who is at the ‘put-everything-in-my-mouth-stage’ and a ‘lego-loving’ toddler at the same time, then lego left on the floor or low table can be a choking hazard nightmare. Either, use your play pen for your toddler’s own lego space or pop bubs in the play pen when your toddler is having some lego time. Problem-solved. 7. Renovating your home? If you’re midway through a home renovation, you’ll be surrounded by power tools, open paint cans and sawdust, a play pen is a safe space for your little one to hang out and play with their own toys while the professionals get on with your ‘renos’. 8. A reading nook Reading with your baby or toddler can be one of the best things you can do with them. Your baby learns language by copying sounds, recognizing pictures and learning words. Set your play pen up as your special reading ‘nook’. Add pillows, blankets, a night light and a basket full of their favourite books. 9. Ball Pit fun! Who doesn’t love a ball pit? For a few bucks you can pick up a big bag of plastic balls to add to your play pen and you’ve got instant fun. 10. When the garden needs some maintenance On a lovely summer’s day, you might just be hankering to get stuck into your garden or mow the lawns. Gardening is not so easy when you have a baby. Take you play pen outside, pop it under a tree and let baby enjoy the sights and sounds of summer while you work around him. 11. A Christmas Tree Safe Space If you’ve ever had a crawling toddler in the house at Christmas time, you’ll know what a hazard (and pain) the Christmas tree can be. Bubs wants to pull it down, eat the decorations and suck on the presents underneath. Save your sanity and pop the tree and presents inside the play pen! 12. The best cubby ever! Once your babies have outgrown their play pen, it works as the best cubby or playhouse space. Give your little ones’ free reign with blankets, pillows and cushions to make the space their own. There’s nothing better than crawling into a cozy space of your own with a night light and your favorite soft toys. A playpen that goes up and down quickly and can be moved from one room to another or from inside to outside is a great option. Use your play pen for times when you need to pop bubs down in their own safe space so you can answer the door, vacuum the house or cook dinner. Buy your own play pen
Learn more
14 Self-Care Winter Tips for Parents
Winter can be a tricky time for parents. Because it's cold, it's harder to get outside, get motivated and stay healthy. Don't let the winter blues kick in! Check out our 14 Tips to Self-Care this Winter. 1. Early to bed Aim to go to bed at the same time & wake up at the same time 2. Hydrate! Drink 8 glasses of water per day 3. Food Glorious Food Make vege soup with winter root vegetables, get the slow cooker out & make some hearty stews & curries 4. No excuse exercise Even if it’s raining, wrap yourself & babies up & pound the pavement 5. Let in the fresh air Although the air is crisper, don’t forget to ventilate your home daily & let the fresh air in & the bad bugs out 6. Make a plan On a cold day sometimes it seems easier to stay at home, but make a plan & hit the park, swings, indoor pool or library 7. Turn on the tunes Play your fav dance tunes or calm yourself (& the kiddos) with some soft beats 8. “Oooohhhmm” It’s amazing how good you’ll feel after 20 minutes of yoga, meditation or stretching 9. Get in hot water Run yourself a hot bath with bubbles or jump in a hot shower 10. Declutter! Get your little ones to ‘help’ you declutter the play area, bedrooms or kitchen 11. Get arty Bring out the pens, paper, scissors, glitter & whatever else you can find, & get creative 12. Read a good book, or 20 Pile up the pillows, grab a pile of books & read to your babies to bring calm to the chaos 13. Connect Visit a friend, ring your mum, join a club, take up a new hobby, join a parent group or volunteer 14. Get back to nature Walk through the forest, along the beach, by the river, up a hill & down the other side
Learn more
10 Reasons why we LOVE humidifiers!
We’ve been using this little gem of a product for around two years and I often wonder why we didn’t invest in one sooner. We now have three humidifiers that make their way around different rooms in our family home. Do we really need three you ask? Well, when you’ve got kids, often at least two members of the household have a cold or cough at any one time, so that’s two bedrooms taken care of. Then there’s the longue area where we run our heat pump, which pumps out dry air. Apart from the fact dry air dries out our skin, hair and nails, it also creates a nasty breeding ground for cold and flu bugs, and we all know how quickly a cold makes its way through the family unit. I’m sure there’s more than just ten reasons you should use a humidifier, but let’s start with this list of gems… Avoid Dry Skin & Lips When you’re inside and running your heat pump or air con, your skin starts to lose its moisture. You know that feeling … tight, dry, itchy, flaky and dull skin. A humidifier adds moisture to the air and helps naturally rehydrate your skin. Ease Illnesses When your kiddo is suffering from a stuffed-up nose, sore throat or constant cough you’ll do just about anything to relieve their discomfort, not only for their well-being but so you can get some much-needed sleep yourself. Humidifiers help moisturise the nasal, throat and lung passages, making it easier for air to pass through. Ward off ‘Man-Flu’ (sorry guys) Studies have shown that humidifiers reduce the risk of developing the flu. Researchers found that after adding the influenza virus to the air with a simulated cough, humidity levels above 40 percent rapidly deactivated virus particles, making them much less likely to be infectious. Another case study found that children living in dry air homes are seven times more likely to be absent from school due to colds and flu. Relieve Allergies Breathing higher humidity air is one way to relieve the discomfort and symptoms of allergies. Hay fever for example, often includes nasal congestion, irritation, and inflammation of the delicate, moist tissues of the nasal mucosa. Reducing inflammation of these tissues can provide quick relief. This then allows your moistened nasal tissues to blow out irritants and allergens from your nasal cavity, reducing your allergy symptoms. Sleep Baby Sleep When your baby is older than 3 months you can start adding some essential oils to your humidifier to promote sleep. Check which ones are safe, but we love to add a drop of lavender or chamomile. Both are renown for having a smoothing and calming effect on babies. Help Warm your Home Humid air feels warmer than dry air, so by running a humidifier in the winter you’ll find your power bill gets reduced. Your Houseplants will love you for it Your moisture-loving houseplants will love your humidifier and become more vibrant, and your wooden floors or furniture are likely to last longer. Reduce Snoring Many people don’t realize that dry air can actually contribute to — even increase the severity — of your snoring symptoms. This happens because insufficient moisture in the air causes the throat to swell and the nose to become congested. If you have a snoring partner, then a humidifier may just be worth its weight in gold. Keep those pesky mosquitos away! There are all sorts of lovely essential oils you can add to your humidifier, but if you’re determined to keep biting bugs away, try adding a combination of patchouli, clove and lemongrass. They work particularly well on mosquitos. Obviously, you’ll need to check your humidifier copes with oils added. Asthma Relief If your child has asthma, you’re probably aware of the balance of humidity they require in the environment to breathe properly. If the air is too dry, one set of symptoms will crop up, and if the air is too humid, a whole new set of problems appear. While asthma is a condition that should only be treated by doctor, there are a number of benefits humidifiers can provide to the sufferer. Humidifiers work by reducing triggers, so a humidifier can help you breathe easier. If you’re using a humidifier to relieve asthma it’s important to follow some strict guidelines including using distilled water (changed daily), cleaning the tank frequently and monitoring the humidity level in the room. We could think of a bunch more reasons why you need a humidifier in your home, but this list is a good place to start …..so sit back and breathe easy…. Get your Blissful Bedtime Humidifier
Learn more
